Clear Epoxy Over Concrete For A Polished Look with Epoxy Flooring Benefits
Welcome to the sunny and tropical paradise of Port St. Lucie, Florida—where bright skies, lush greenery, and coastal vibes shape our daily lives. Whether you own a cozy home, a busy retail store, or manage a commercial facility, you know that Florida’s heat, humidity, and occasional storms can put even the sturdiest of surfaces to the test. If you have a concrete floor—whether indoors or out—you’ve probably discovered how reliable it can be for standing up to moisture and heavy use. But what if you’re craving something with higher performance, improved stain resistance, and a unique aesthetic that still preserves that cool, industrial-chic look of raw concrete?
This is where clear epoxy over concrete comes in. By combining the structural stability of concrete with the protective and decorative capabilities of epoxy, you can enhance longevity, transform the visual appeal, and even introduce custom design elements like staining, tinted epoxy, and non-slip additives. In this extended guide from Floor Kings—your go-to flooring experts in Port St. Lucie—we’ll dig deep into every aspect of clear epoxy flooring. From understanding the fundamentals of epoxy chemistry to exploring how tinted and stained concrete can deliver a one-of-a-kind surface, you’ll learn how clear epoxy is paving the way for Florida homeowners and business owners to enjoy floors that are as functional as they are fashionable.
If you’ve been considering an upgrade to your existing concrete floor (or are just curious about new finishes), read on. We’re about to embark on a comprehensive tour of the benefits, process, design possibilities, and maintenance insights for clear epoxy over concrete.
1. Why Clear Epoxy Over Concrete?
Concrete floors are already well-known for their durability and cost-effectiveness. Many homeowners and businesses in Port St. Lucie opt for concrete because it stands up to heavy foot traffic, machinery, and Florida’s often unpredictable weather. However, basic concrete can be prone to staining, slight wear over time, and surface imperfections like cracks or discolorations.
Clear epoxy acts as a protective barrier that adheres to the concrete, providing several key advantages:
Enhanced Durability
Epoxy resists abrasion, chemicals, and impact damage more effectively than uncoated concrete.
Helps prevent chips, cracks, and wear in high-traffic areas or where heavy objects are frequently moved.
Moisture Resistance
Port St. Lucie’s humid climate and occasional tropical storms mean moisture is a perpetual concern. Epoxy coatings form a nearly impermeable layer, helping to keep water, salt, and humidity from penetrating and damaging the concrete below.
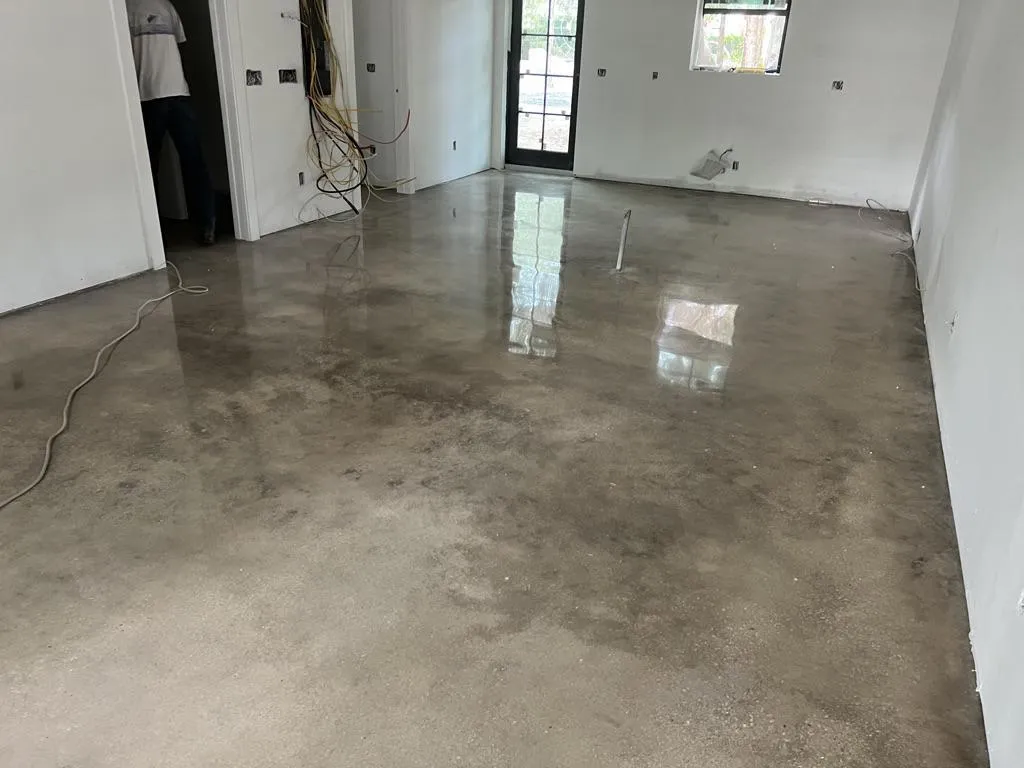
Retaining the Concrete Look
Unlike paint or opaque epoxy finishes, clear epoxy preserves the raw aesthetic of concrete—its color, texture, and character—while still adding depth and shine.
If you love the industrial-chic vibe or the unique patterns in your slab, a clear epoxy topcoat can be ideal.
Low Maintenance
Epoxy-coated floors are easier to clean than bare concrete. Dust and debris sit on the surface rather than seeping into the pores of the concrete, making regular sweeping and occasional mopping sufficient for upkeep.
Resistant to most stains (oil, grease, chemical spills), so you don’t have to worry about permanent blemishes.
Customizable Options
From non-slip additives that enhance traction to tinted epoxy that can subtly color the floor, you have plenty of ways to personalize your final look.
Pairing epoxy with concrete stains (before applying the clear coat) opens up endless design possibilities—earthy tones, marbled effects, even custom logos.
Long-Term Value
The initial investment pays off in longevity, durability, and reduced maintenance over time. Especially in a coastal area where floors can deteriorate from moisture and salt-laden air, epoxy can significantly extend the life of your concrete slab.
With these benefits in mind, it’s easy to see why more and more Port St. Lucie residents are turning to clear epoxy coatings. Whether you want to elevate your garage, modernize your patio, or revamp your commercial showroom, a well-executed epoxy application can make all the difference.
2. Clear Epoxy vs. Other Epoxy Finishes
Epoxy coatings come in a variety of formulations, each offering different benefits and aesthetics:
Solid Color Epoxy: This is a pigmented epoxy system that fully covers the concrete’s appearance, giving a uniform color. While great for certain design themes, you lose the natural look of concrete.
Metallic Epoxy: Typically used for decorative and high-gloss finishes, metallic pigments create dynamic, swirling patterns that can mimic marble or lava flows. Beautiful—but you won’t see the concrete beneath.
Epoxy Flake Systems: Ideal for garage floors, flake systems broadcast colored vinyl flakes into a tinted epoxy base, offering extra texture and visual variety. Again, your concrete’s natural look is hidden.
Clear Epoxy: Allows the texture, coloration, and unique characteristics of the concrete slab to remain visible. It’s the perfect choice if you appreciate the raw or stained concrete aesthetic but want the protective benefits of epoxy.
Many Floridians love how clear epoxy can showcase the existing slab. Some older floors have interesting patinas or slight imperfections that add character. By sealing and highlighting those quirks, you create a floor with plenty of personality. Additionally, you can add tinted layers or apply acid stains first to get a custom color—then top it with clear epoxy for an ultra-durable surface that still reveals the concrete’s underlying texture.
3. The Magic of Concrete Staining and Dyes
One of the most exciting ways to personalize a clear epoxy floor is to stain or dye the concrete first:
Acid Staining
How It Works: Acid-based stains react chemically with the lime content in concrete, creating a variegated, often marble-like effect with rich earth tones—browns, tans, greens, and rust hues.
Uniqueness: Because of the chemical reaction, every floor turns out differently. Even the same product can yield slightly different results on different sections of the same slab, so your floor is truly one of a kind.
Water-Based Stains & Dyes
Vibrant Options: Water-based products come in a wider color range, from soft pastels to bold blues and reds. You can also layer or blend colors for custom designs.
Predictable Outcomes: Unlike acid stains, water-based stains generally produce more uniform and predictable color results.
Timing
Before Epoxy: You’ll want to apply the stain or dye after the concrete has been thoroughly cleaned and prepped, but before applying any primer or clear epoxy.
Layering: Once the stain has fully cured and been neutralized (in the case of acid stains), you can then proceed with your epoxy layers. This approach locks in the color while the clear epoxy adds depth and gloss.
Benefits of Staining Before Clear Epoxy
Aesthetics: Stains can lend a warmer, richer feel than raw concrete alone. A clear epoxy topcoat can magnify these colors, creating a visually dramatic effect.
Versatility: You’re not limited to just one color. Different sections of your floor can have different stains, or you can create patterns using painter’s tape or stencils.
Enhanced Depth: Once you lay down the clear epoxy, the stain underneath can appear more three-dimensional, as if you’re gazing down into a layer of polished stone.
Practical Considerations
Surface Condition: If your concrete has cracks, spalling, or significant damage, you may need to patch or repair it first. These repairs may show through the stain, though some people find the contrast adds character.
Uniformity vs. Character: Decide early if you’re aiming for a uniform color or are happy to embrace natural variations. Acid stains especially can highlight differences in the concrete’s composition.
Professional Expertise: While DIY staining is possible, working with an experienced crew like Floor Kings ensures proper application, neutralization, and surface prep, maximizing your final result’s beauty and longevity.
Whether you prefer the organic patterns of acid staining or the controlled vibrancy of water-based dyes, combining these techniques with clear epoxy yields a floor that is not only tough but also visually striking—perfect for making a statement in your Port St. Lucie home or business.
4. Tinted Clear Epoxy: Subtle Color, Big Impact
If staining the concrete beforehand seems like too much of a commitment, consider tinted clear epoxy. Instead of changing the color of the concrete slab itself, you add a small amount of pigment or tint to the epoxy resin:
Soft & Subtle
Tinted epoxy can be formulated to retain much of the concrete’s visible texture, only imparting a slight hue. Think of it like a light wash of color.
Even Coverage
Because the tint is mixed uniformly into the epoxy, the final finish is generally more consistent than acid-staining can provide—though you will still see the underlying slab’s details.
Layering Options
You can apply multiple coats with varying levels of tint. For instance, the first layer might be slightly tinted, while the topcoat is completely clear, creating an effect of layered depth.
Customization
Tints come in a near-endless range of colors. If you want a hint of teal that echoes Port St. Lucie’s coastal vibe or a warm honey tone to complement a wooden interior, tinted epoxy can match your aesthetic perfectly.
Maintenance & Durability
The tinted coat retains all the protective properties of a standard clear epoxy—resisting moisture, stains, and abrasions.
Because the color is in the epoxy itself, it’s less likely to wear away from foot traffic compared to some surface-level stains.
Tinted epoxy strikes a balance between the raw appeal of concrete and the desire for subtle color enhancements. It’s also a great option if your slab’s color is inconsistent or if you have patched areas you’d like to unify under one gentle tint.
5. Non-Slip Additives: Safety First
In a place like Port St. Lucie—where humidity, rain, and the occasional tracked-in sand can create slick conditions—slip resistance is a top priority. Fortunately, clear epoxy floors can incorporate non-slip additives that improve traction without sacrificing aesthetics.
What Are Non-Slip Additives?
Typically, these are finely ground materials (like aluminum oxide, silica sand, or polymer grit) mixed into the final coat of epoxy. They’re virtually invisible, yet they provide a texture that enhances grip.
Where Are They Essential?
Garage Floors: Water, oil, and automotive fluids can create slippery conditions.
Pool Decks/Patios: Anywhere with frequent water exposure.
Commercial Kitchens & Entrances: Floors that see high foot traffic and potential spills.
Application Techniques
Mix-In: The additive can be thoroughly mixed into the epoxy before pouring, ensuring even distribution across the floor.
Broadcast: Another approach is to broadcast (sprinkle) the non-slip media onto the epoxy while it’s still wet, then seal it with a clear topcoat.
Balancing Safety & Appearance
You can choose different coarseness levels for the additive. A finer grit will be less noticeable but still increase traction. A more robust grit offers greater slip resistance but may create a slightly textured feel underfoot.
Clear epoxy is highly reflective; if you add a large amount of grit, the surface might appear more matte. Decide how much shine you’re willing to sacrifice for safety.
Maintenance of Non-Slip Floors
Non-slip additives can slightly change how you clean the floor. While it remains easy to sweep, some textures may hold onto dirt a bit more. Regular mopping and occasionally hosing off (for outdoor patios) keep the surface looking fresh.
Implementing a slip-resistant element into your clear epoxy floor means you can have the best of both worlds: a stunning, glossy concrete aesthetic and safer traction. With Florida’s propensity for occasional torrential rain, you’ll appreciate this extra layer of security.
6. The Installation Process
A successful clear epoxy project involves meticulous planning and proper execution. Here’s an overview of how Floor Kings manages the process:
Assessment & Consultation
We start by examining your existing concrete floor. We look for cracks, moisture issues, or uneven spots.
We discuss design preferences—whether you want a stain, tinted epoxy, or just a simple clear coat. We also talk about slip-resistance needs.
Surface Preparation
Cleaning: We remove all debris, grease, or old coatings. In some cases, chemical cleaners or degreasers are necessary.
Grinding: To ensure proper epoxy adhesion, the concrete surface is mechanically profiled.
Repairs: Cracks, joints, or pitted areas are filled with an epoxy patching compound or polymer-modified cement. These repairs must cure and be smoothed before proceeding.
Optional Staining/Dyeing
If you’ve chosen to stain or dye the concrete, we do that after surface prep but before applying any primer.
Acid stains need time to react and then must be neutralized. Water-based stains or dyes usually require less downtime but still need to dry fully before the next step.
Priming
A compatible epoxy primer is applied to seal the concrete’s pores and promote superior bond strength. This step can also help mitigate air bubbles (outgassing) that sometimes form when epoxy is laid directly on porous concrete.
Applying the First Coat of Clear Epoxy
We meticulously mix the resin and hardener according to manufacturer specifications. This is a time-sensitive process—once mixed, there’s a limited working window before the epoxy starts to cure.
The mixture is poured onto the floor and spread using squeegees, rollers, or notched trowels. We aim for an even layer of the appropriate thickness, typically measured in mils (thousandths of an inch).
Adding Tints or Non-Slip Media
Tint: If you chose a tinted epoxy, the pigment is pre-mixed into the epoxy resin. We ensure thorough blending so color distribution is uniform.
Non-Slip Additives: Depending on the method (broadcast or mix-in), we either broadcast the grit on top of the wet epoxy or mix it directly into the resin.
Curing Time
The epoxy must be allowed to cure undisturbed, typically anywhere from 12 to 48 hours depending on ambient temperature and the product used. Florida’s heat can speed up or slow down this process, so it’s crucial to control the environment if possible.
Subsequent Coats or Topcoats
Most clear epoxy systems require multiple coats for optimum depth, durability, and shine. After the first coat cures, we lightly sand the surface to promote adhesion, then apply the next.
A final topcoat—often a urethane or polyaspartic seal—can improve UV stability, gloss, and scratch resistance, especially for floors exposed to strong Florida sunlight.
Inspection & Cleanup
Once the final layer has cured, we inspect the floor carefully for any inconsistencies or areas needing touch-up.
We remove any painter’s tape, protective coverings, and equipment. The space is now ready to wow visitors or customers.
Post-Installation Care
Floor Kings provides detailed care instructions for your new epoxy floor, including recommended cleaners, frequency of maintenance, and tips to extend longevity.
This thorough step-by-step approach ensures your clear epoxy floor in Port St. Lucie turns out both functional and gorgeous—capable of withstanding everything from daily wear to Florida’s muggy weather.
7. Maintenance and Longevity
Clear epoxy floors are relatively low-maintenance compared to other flooring types, but a bit of routine care helps keep them gleaming:
Regular Cleaning
Sweep or vacuum to remove grit that can cause micro-scratches.
For deeper cleaning, a damp mop with a gentle, pH-neutral cleaner will suffice.
Avoid Abrasive Tools
Steel wool, hard-bristled brushes, or scouring pads can mar the epoxy’s surface. Use soft mops or microfiber pads.
Wipe Up Spills Quickly
Epoxy is highly stain-resistant, but some chemicals—like strong solvents—could dull the shine if left unattended.
For oil, grease, or chemical spills, use a gentle detergent and water.
Protect from Excessive Heat and UV
In extremely hot climates, placing mats under hot equipment can prevent thermal shock.
If the floor receives significant direct sunlight, consider a UV-stable topcoat (urethane or polyaspartic) to prevent discoloration.
Periodic Recoats
Depending on traffic levels, you might eventually want to apply a fresh topcoat to restore shine and protective qualities. This is much easier than installing a brand-new floor—usually just a quick scuff-sand and reapplication.
With these simple steps, your new epoxy floor can maintain its beauty and structural integrity for a decade or more, making it a valuable investment for any Port St. Lucie property.
In Port St. Lucie, Florida, where environmental conditions can be punishing and design styles range from tropical chic to contemporary coastal, clear epoxy over concrete offers an ideal blend of aesthetics and performance. You get to preserve the authentic look of concrete—be that a raw industrial finish, a beautiful stained surface, or a lightly tinted hue—while enjoying the durability, moisture resistance, and low maintenance that epoxy provides.
From non-slip additives for safer walking surfaces to stains and dyes that highlight or transform your slab’s natural character, the customization possibilities are almost endless. Whether you’re overhauling a large commercial showroom, upgrading a garage, or reinventing a kitchen floor, a clear epoxy finish can enhance both form and function.
Here at Floor Kings, we specialize in helping Port St. Lucie residents and business owners achieve their dream floors. Our team will guide you from the initial consultation—where we assess your concrete’s condition and discuss your style preferences—right through to the final topcoat and beyond.
If you’re ready to explore how clear epoxy can rejuvenate your concrete floor and elevate your space, contact us today. We look forward to providing you with an epoxy finish that not only meets the demands of Florida’s climate but also turns heads for all the right reasons. Let’s transform your concrete floor into a masterpiece together!